Hardware options
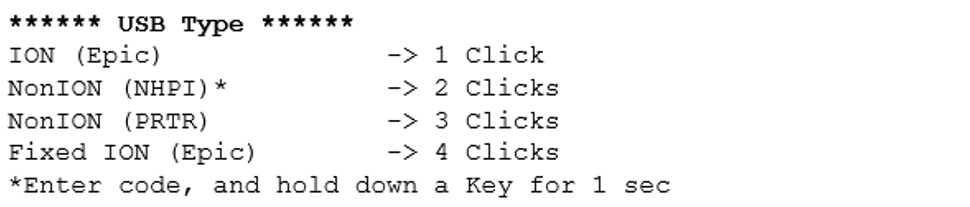
Set USB type
Set the USB type using the configuration menu. Select Hardware Options in the Configuration Menu.
Be extremely careful in changing any of the printer settings to avoid inadvertently changing other settings that might affect the performance of the printer.
Press the Paper Feed button to select an option.

Set USB speed
Set the USB speed using the configuration menu. Select Hardware Options in the Configuration Menu.
Be extremely careful in changing any of the printer settings to avoid inadvertently changing other settings that might affect the performance of the printer.
Press the Paper Feed button to select an option.

Set print mode
Set the Receipt Print Mode using the configuration menu. Select Hardware Options in the Configuration Menu.
Be extremely careful in changing any of the printer settings to avoid inadvertently changing other settings that might affect the performance of the printer.
Press the Paper Feed button to select an option.

Print density
This function makes it possible to adjust the energy level of the print head to darken the printout. An adjustment should only be made when necessary. The factory setting is 100%.
Choose an energy level no higher than necessary to achieve a dark printout.
Failure to observe this rule may result in a printer service call or voiding of the printer warranty. Consult an NCR technical support specialist for any questions.
Press the Paper Feed button to select an option.
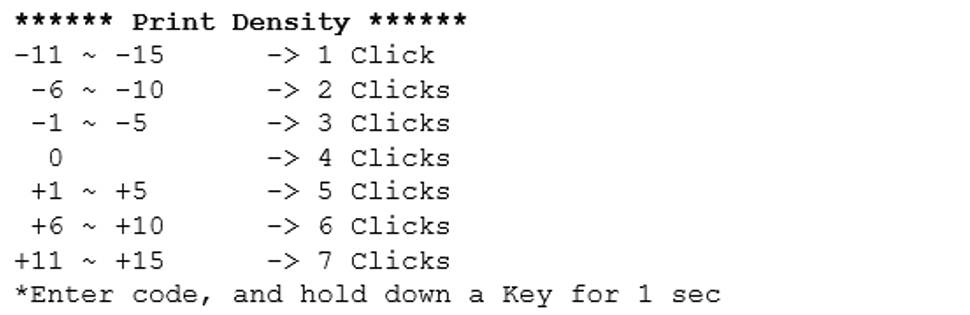
Selecting Option 1 displays the following submenu.

Selecting Option 2 displays the following submenu.

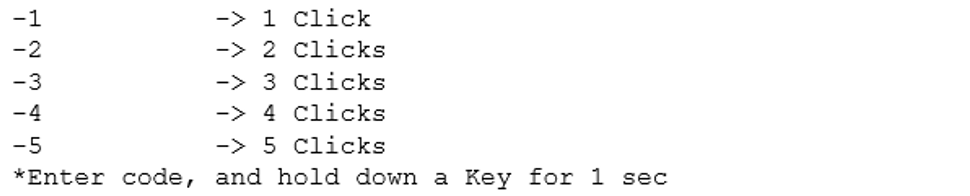
Selecting Option 3 displays the following submenu.
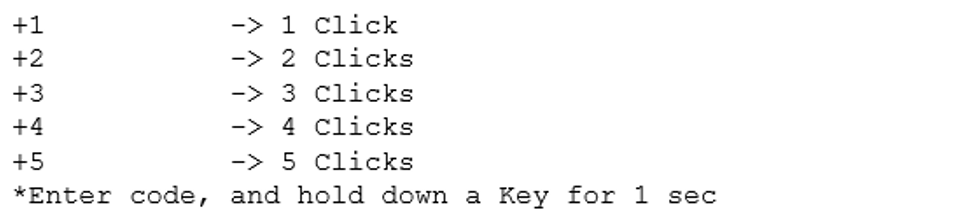
Selecting Option 5 displays the following submenu.
Selecting Option 6 displays the following submenu.
Selecting Option 7 option displays the following submenu.

Power supply
This function allows the user to set the maximum power for the printer to the below modes available.
Press the Paper Feed button to select an option.
Series i
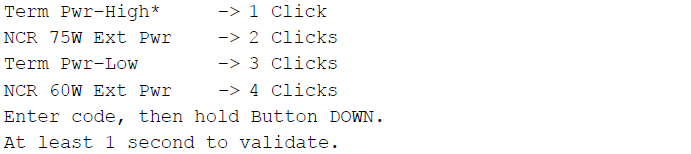
Series ii

Set standby mode
Enable or disable the Standby Mode using the configuration menu. If the standby mode is enabled, the printer shifts to the standby mode in order to save the power consumption in the idle mode when the printer is in the idle mode.
Printer will exit from standby mode to normal mode in below criteria:
- Printer receives any data
- Feed key is pressed
- Receipt cover is opened / closed
After power–on, it will go to standby mode if it does not receive any transaction data in 60 seconds.
After one transaction, it will go to standby mode if it does not receive any transaction data in 1 second.
In disable setting, the printer does not shift to the standby mode. During going back from the standby mode, the response of the printer will be slightly delayed compared to the normal mode response.
Be extremely careful in changing any of the printer settings to avoid inadvertently changing other settings that might affect the performance of the printer.
Press the Paper Feed button to select an option.

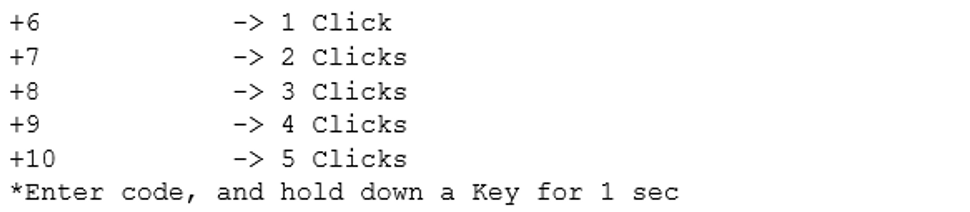
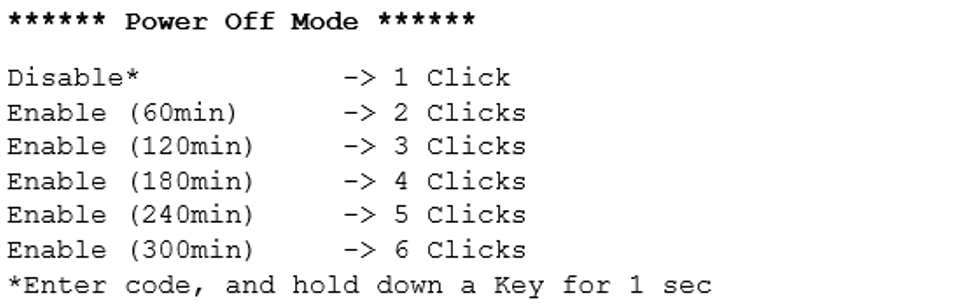
Set power off mode
Set the Shift Time to Power Off using the configuration menu. If the printer is in standby mode for the time that is defined by this setting, printer automatically power off. Once enter power off mode, all LED are turned off. If feed key is pressed, printer exit from power off mode and enter normal mode.
Be extremely careful in changing any of the printer settings to avoid inadvertently changing other settings that might affect the performance of the printer.
Press the Paper Feed button to select a Shift Time to Power Off option.
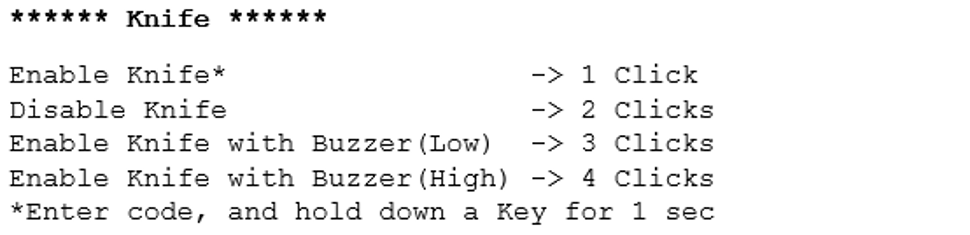
Set knife option
Set the Knife option using the configuration menu. Answer No to the questions printed on the receipt until the knife options are displayed.
Be extremely careful in changing any of the printer settings to avoid inadvertently changing other settings that might affect the performance of the printer.
Press the Paper Feed button to select an option.
Paper width
This function allows the user to set the default paper width for the receipt thermal printer to 58mm or 80mm wide.
Press the Paper Feed button to select an option.

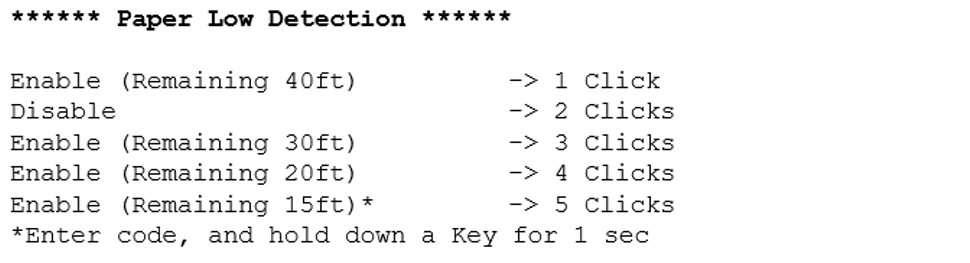
Set paper low detection
Paper Low Sensor makes it possible to enable or disable the paper low sensor for particular printer configurations.
Press the Paper Feed button to select an option.
Set color paper option
This function allows the user to set the color paper option to Monochrome or Color Paper.
Press the Paper Feed button to select an option.

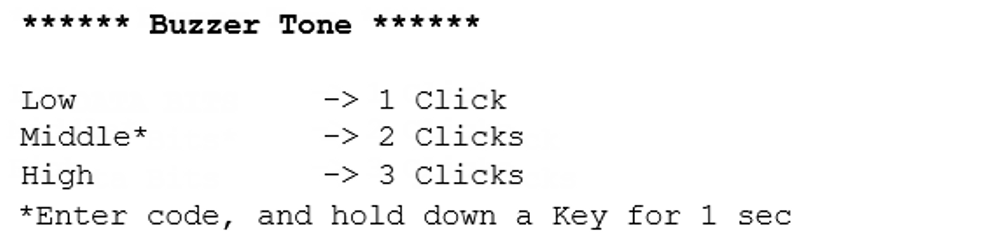
Set buzzer tone
This function allows the user to set the Buzzer Tone to Low, Middle, and High.
Press the Paper Feed button to select an option.
Set power LED control
Set the power LED control using the configuration menu. Answer No to the questions printed on the receipt until the power LED control options are displayed.
Be extremely careful in changing any of the printer settings to avoid inadvertently changing other settings that might affect the performance of the printer.
Press the Paper Feed button to select an option.

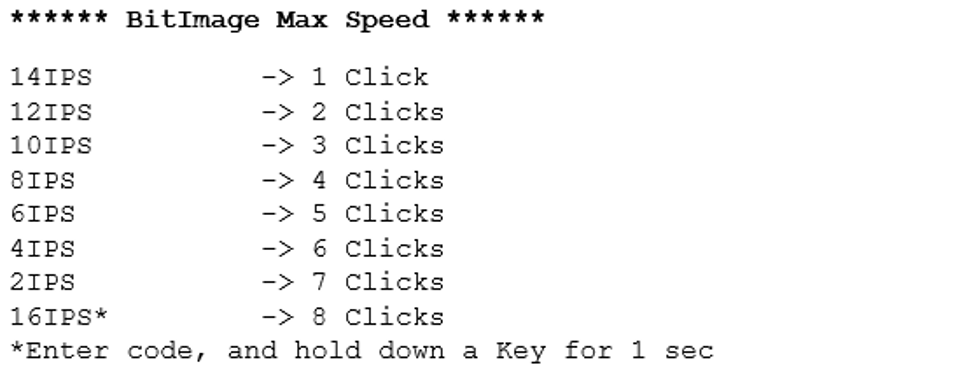
Set Bit-Image Max Speed
This setting is supported in Series ii only.
Set the Bit Image max speed using the hardware sub configuration menu. This bit image max speed set the speed of bit images and grey image printing. The speed of printing varies from 2IPS to 16IPS.
Be extremely careful in changing any of the printer settings to avoid inadvertently changing other settings that might affect the performance of the printer.
Press the Paper Feed button to select an option.
Set Paper Type
This setting is supported in Series ii only.
Set the Paper type using the hardware sub configuration menu. This option sets paper type with optimum parameter values in the thermal print control.
Be extremely careful in changing any of the printer settings to avoid inadvertently changing other settings that might affect the performance of the printer.
Press the Paper Feed button to select an option.
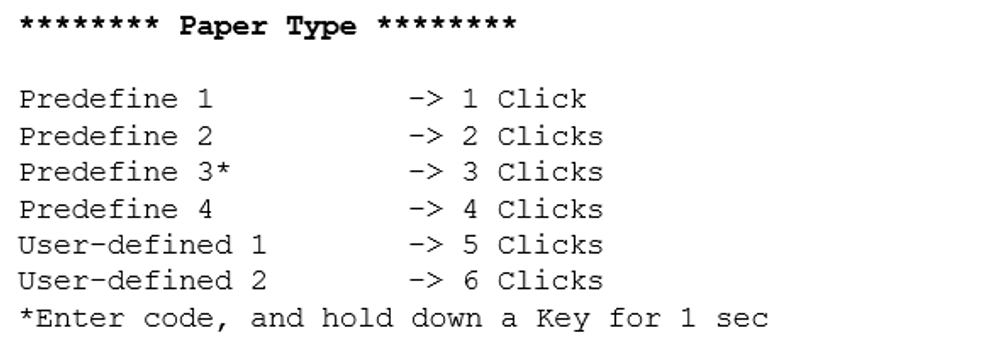
User-defined 1 and User-defined 2 are only available in paper type setting when they are defined or stored in the flash memory
