Creating merchandise menu items
To create a merchandise menu item, complete the following tasks in the order presented:
- Ensure that the item exists in the store database. The code and price of the item should be defined in the database.
- Create a POS button for the merchandise menu item.
Creating a POS button for a merchandise menu item
This task enables the merchandise menu item to be accessed on the POS application and eligible for customer transactions. The following is a sample image that specifies the parts of a POS button for a merchandise menu item.

The item price is based on the item's data in the store database. The item price cannot be modified using the merchandise menu feature. If an item price is updated from the database, the POS application will automatically reflect the changes on the POS button of the item.
To create a POS button for a merchandise menu item, create a new record in the Merchandise Menu Buttons parameter group in the EOM WebOffice. Use the following table to determine the appropriate action for each option.
| Option name | Required | Action | Sample value |
|---|---|---|---|
| Button ID | Yes | Enter the numeric ID of the button, between two and 999999, as preferred. Note
|
301 |
| Parent Menu Name | Yes | This option determines in which merchandise menu the POS button will be displayed in on The POS application. Do one of the following:
Caution
Do not enter the name of the designated merchandise menu for the POS button. This may cause the button to not function properly when pressed on the POS application. |
Books |
| Labels | No | Enter the name or title text of the POS button. Important
|
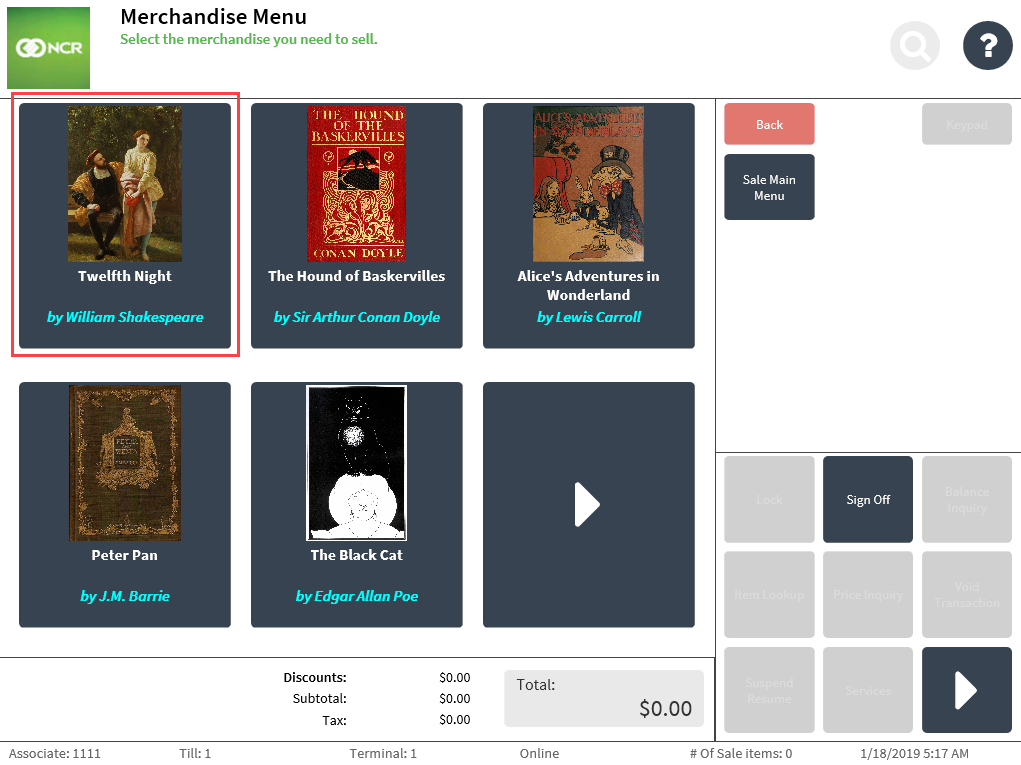
Twelfth Night |
| Additional Text | No | Enter a second line of text for the button. This text will be displayed below the label of the button. Note
|
by William Shakespeare |
| Background Color | No | Enter the hexadecimal code of the color to be used as the background color of the button. Note
If left blank, the POS application uses #374350 (oxford blue) as the default color. |
#660099 (purple) |
| Foreground Color | No | Enter the hexadecimal code of the color to be used as the color of the label text of the button. Note
If left blank, the POS application uses #FFFFFF (white) as the default color. |
#FFC0CB (pink) |
| Background Color Pressing | No | Enter the hexadecimal code of the color to be used as the background color of the button when pressed on the POS application. Note
If left blank, the POS application uses #374350 (oxford blue) as the default color. |
#0A8125 (green) |
| Foreground Color Pressing | No | Enter the hexadecimal code of the color to be used as the color of the label text when the button is pressed on the POS application. Note
If left blank, the POS application uses #FFFFFF (white) as the default color. |
#F9FD00 (yellow) |
| Action Type | Yes | Select Termination Key to enable the POS application to add the item to a sales transaction when the button is selected on the POS application. | TerminationKey |
| Action Data | Yes | Enter the code of the item according to the store database. | 00053119900327 |
| Action Termination Key | Yes | Select Item Selected Key from the drop-down list of options. This value classifies the POS button as an eligible item for sale in the store. | ItemSelectedKey |
| Image Location | No | Enter the URL location of the image that will be used as the display image of the button on the POS application. | https://upd.com/book1.jpg |
Sample merchandise menu item
The sample configuration specified in the preceding table creates the highlighted merchandise menu item in the following image.