Creating the Enterprise Databases
The Advanced Store enterprise databases are installed and set up on the Database Server using the NCR Data Setup utility. This utility is installed from the NCR DSR Enterprise Server.msi installer. NCR recommends running the NCR Data Setup utility on a remote server, such as the Messaging Server, and not directly on the Database Server.
Running NCR Data Setup must be performed only once.
This topic describes the steps required for creating databases for the Advanced Store enterprise.
Specifying the Database and Log File Location
Configure the NCR Data Setup configuration file to specify where the NCR Data Setup tool should place the Advanced Store data and log files. Although the data and log files are located on the Database Server, the data setup configuration file required for this task is located on the Messaging Server. There are two methods for configuring the Data Setup file. This publication describes only one of the methods.
Before starting this step, make sure that the data and log file folder(s) have already been created on the database server during the database server installation process. For more information, refer to Creating the Database Folders.
Pay close attention when editing the configuration file.
This task uses the following file.
| File name | Location |
|---|---|
| NCR.Retail.NCRDataSetup.exe.config | %PROGRAMFILES(X86)%\NCR\DSREnterprise\Utilities |
To specify the directory where the data and log files will reside, follow these steps:
- On the Messaging Server, open the NCR.Retail.NCRDataSetup.exe.config file using a text editor.
- Search for the <CustomData> tag.
- Within the <CustomData> tag, there are two <Database> elements. Locate the second <Database> element.Tip
One way to verify that you’re editing the correct code block is to see if it has a <Setting name> attribute for the Data File Name and <Setting name> attribute for the Log File Name, but not a setting for the Data File Path.
Example<Database id="TransactionLogDb">
<Setting name="dbDataFileName">D:\Databases\DataFile\TransactionLogDb_log.mdf</Setting>
<Setting name="dbLogFileName">L:\Databases\LogFile\TransactionLogDb_log.ldf</Setting>
</Database>NoteWhen following the method described in this publication, there is no need to configure the first <Database> element within the <CustomData> tag.
- Remove the comment marks from the second <Database> code block.
- Copy this entire <Database> code block.
- Paste the copied code block 14 times in a row for a total of 15.
- For each database in the code blocks that you pasted, set the following attributes.
Attribute/Element Value <Database id> Ensure that the value for the <Database id> matches the exact value specified in the <DatabaseInstall> tag in the NCR.Retail.NCRDataSetup.exe.config file. Following is a list of database identifiers:
- EOMData
- TrustedCustomer
- NCRWO_EJ
- NCRWO_Transactions
- CoreDb
- ProductDb
- TransactionLogDb
- Associate
- RTEStoreManagersDesktop
- NCRWO_FlexWikiSqlStore
- NCRWO_LogDB
- NCRWO_Options
- NCRWO_Transport
- NCRWO_Reports
- NCRWO_WebOfficeSE
NoteThe database IDs listed here may vary from the database names found in SQL Server.
<Setting name="dbDataFilePath"> Do not use this setting unless otherwise directed by your NCR Representative. <Setting name="dbDataFileName"> Specify the drive letter and directory path for the data files that will be created on the Database Server.
NoteThe DataFile and LogFile folders must exist in the path specified.
Example<Setting name="dbDataFileName"> D:\Databases\DataFile\ProductDb_data.mdf</Setting>
<Setting name="dbLogFileName"> Specify the drive letter and directory path for the log files that will be created on the Database Server.
Example<Setting name="dbLogFileName"> L:\Databases\LogFile\ProductDb_log.ldf</Setting>
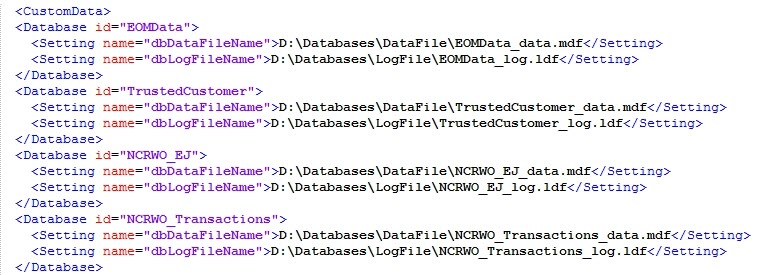
- Save and close the file. The edited file will look similar to the following sample image.
 Note
NoteThis image represents a portion of the configuration file, and does not display all the database IDs required.