Installing NCR UE 7.x on the POS In-Store Server
To install the NCR Universal Engine, follow these steps:
- Run the NCR_UEIOServer.msi installer as Administrator. The Installation Wizard is displayed.
- Select Next. The application displays the Destination Folder screen.
- Select Next to accept the default destination path. Otherwise, select Change to use another file directory.
- Select Next. The application displays the UE Standalone screen.

- Select Integrated Mode.
- Select Next. The application displays the Encryption screen.
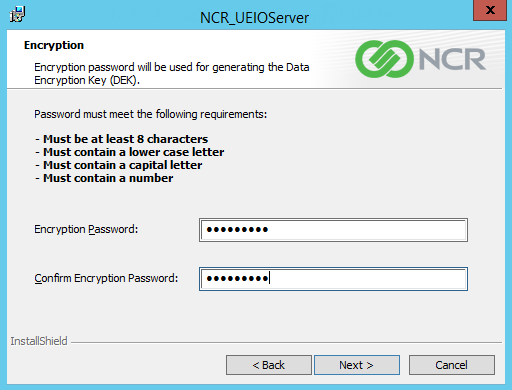
- Enter and then confirm the Encryption Password. The encryption password generates the Data Encryption Key. For more information, consult with an NCR Representative.
- Select Next. The application displays the Universal Engine IO Server Setup screen.
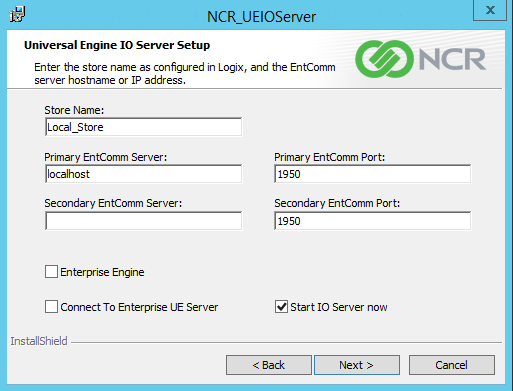
- Enter the Store Name of the primary store server that is connected to Logix and the UE Enterprise Server. The store name is registered in the Logix Server.
- Select the Connect To Enterprise UE Server checkbox to connect to the server where the AMS Broker is installed. This checkbox is required.
- Leave the Start IO Server now checkbox selected.Note
The rest of the fields are not used. Leave the default values.
- Select Next. The application displays the Universal Engine Broker and Coupon Service Setup screen.
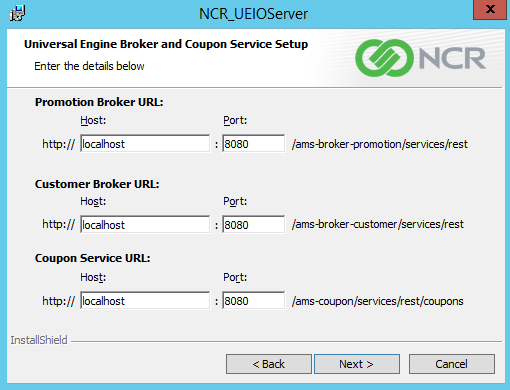
- Enter the following values for the Promotion Broker:
- Host—Indicates the IP address or the computer name of the server where the AMS Promotion Broker is installed. The IP address or the computer name is usually the same as the UE Enterprise Server.
- Port—Indicates the port number used to communicate to the Promotion Broker. Leave the default value of 8080.
- Enter the following values for the Customer Broker:
- Host—Indicates the IP address or the computer name of the server where the AMS Customer Broker is installed. The IP address or the computer name is usually the same as the UE Enterprise Server.
- Port—Indicates the port number used to communicate to the Customer Broker. Leave the default value of 8080.
- Enter the following values for the Coupon Service:
- Host—Indicates the IP address or the computer name of the server where the Coupon Service is installed. The IP address or the computer name is usually the same as the UE Enterprise Server.
- Port—Indicates the port number used by the Coupon Service. Leave the default value of 8080.
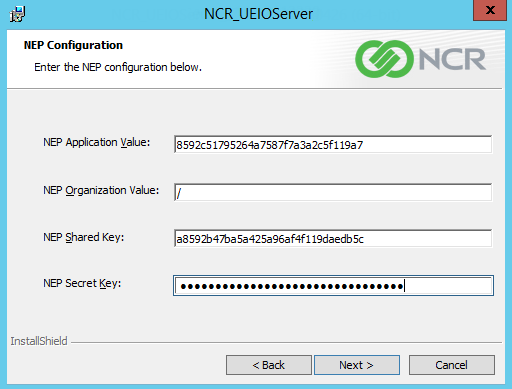
- Select Next. The application displays the NEP Configuration screen. The values in the following image are examples only.
- Enter the following details.
- NEP Application Value—Specifies the identifier used by the application when making calls to the platform APIs. This key is unique to the application.
- NEP Organization Value—Specifies the name of the organization where HTTP requests should be applied. Enter /, which refers to root as the organization.
- NEP Shared Key—Specifies a unique identifier that identifies both the user and the access key. This key provides authentication to use the Security Service API. Each shared key has a corresponding secret key.
- NEP Secret Key—Specifies a secured key that is used to authenticate API requests
- Select Next. The application displays the Ready to Install the Program screen.
- Select Install. When the installation completes, the application displays a message that the installation is successful.
- Select Finish to close the installation wizard. The application displays a message to restart the system.
- Select Yes. The system is restarted.