Enabling TLS support in RabbitMQ
To enable TLS support in the RabbitMQ Server application, complete the following tasks in the order in which they are presented:
- Create the Certificate Authorities (CA) bundle, server certificate, and server key.
- Configure the RabbitMQ node.
Perform this procedure only if the system is configured to use the AMQPS protocol to communicate with RabbitMQ Server when connecting the In-Store Server to the Enterprise. If not, proceed to Running the NCR RabbitMQ Setup utility.
Creating the Certificate Authorities (CA) bundle, server certificate, and server key
The POS In-Store Server must have its own CA bundle, server certificate, and server key. For instructions on creating the certificates and key, refer to the RabbitMQ website (rabbitmq.com).
The following table lists the default filename for each certificate.
| Certificate/Key | Filename |
|---|---|
| Certificate Authorities bundle | ca_certificate.pem |
| Server Certificate | server_certificate.pem |
| Server key | private_key.pem |
Place the files in any directory.
Configuring the RabbitMQ Node
The RabbitMQ node must be configured to know the location of the CA bundle, the server certificate, and the server key. The RabbitMQ node is configured using the following file.
| File name | Directory | |
|---|---|---|
| 32-bit system | 64-bit system | |
| rabbitmq.conf.template | %PROGRAMFILES%\NCR\AdvancedStore\POS | %PROGRAMFILES(X86)%\NCR\AdvancedStore\POS |
| advanced.config.template | ||
Configuring the RabbitMQ node in the rabbitmq.conf.template file
To configure the rabbitmq.conf.template file, follow these steps:
- Open the rabbitmq.conf.template file using a text editor.
- Locate the attributes listed in the following table, remove the comment marks from the attributes, and then modify their values as specified.
Note
If an attribute is not found in the template file, add the attribute.
Attribute Value ssl_options.cacertfile <directory of the ca_certificate.pem file> ExampleC:\ca\ca_certificate.pem
ssl_options.certfile <directory of the server_certificate.pem file> ExampleC:\server\server_certificate.pem
ssl_options.keyfile <directory of the private_key.pem file> ExampleC:\server\private_key.pem file
ssl_options.client_renegotiation true ssl_options.secure_renegotiate true management.ssl.cacertfile <directory of the ca_certificate.pem file> ExampleC:\test\ca_certificate.pem
management.ssl.certfile <directory of the server_certificate.pem file> ExampleC:\server\server_certificate.pem
management.ssl.keyfile <directory of the private_key.pem file> ExampleC:\server\private_key.pem file
management.ssl.client_renegotiation true management.ssl.secure_renegotiate true - Save the file.
Configuring the RabbitMQ node in the advanced.config.template file
To configure the advanced.config.template file, follow these steps:
- Open the advanced.config.template file using a text editor.
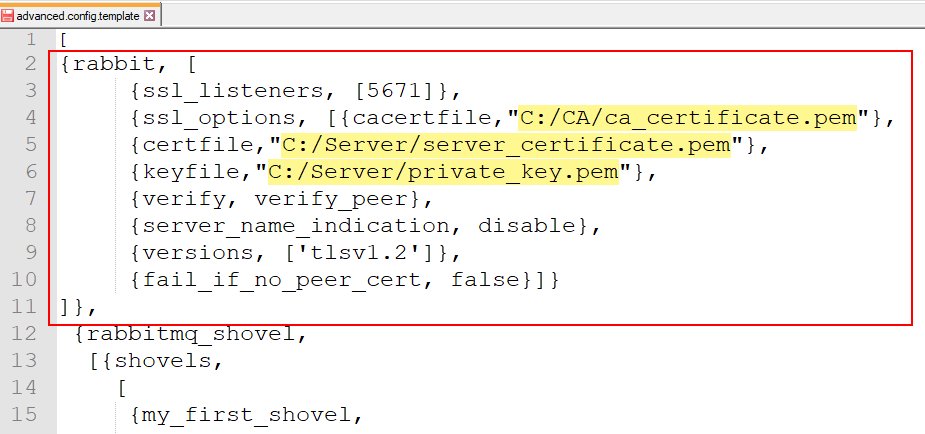
- Copy and paste the following code after the first square bracket ([) in the file. Copy
{rabbit, [
     {ssl_listeners, [5671]},
     {ssl_options, [{cacertfile,"<directory of the ca_certificate.pem file>"},
     {certfile,"<directory of the server_certificate.pem file>"},
     {keyfile,"<directory of the private_key.pem>"},
     {verify, verify_peer},
     {server_name_indication, disable},
     {versions, ['tlsv1.2']},
     {fail_if_no_peer_cert, false}]}
]}, - Enter the directory of the specified certificates and key. The edited section will look similar to the following image.
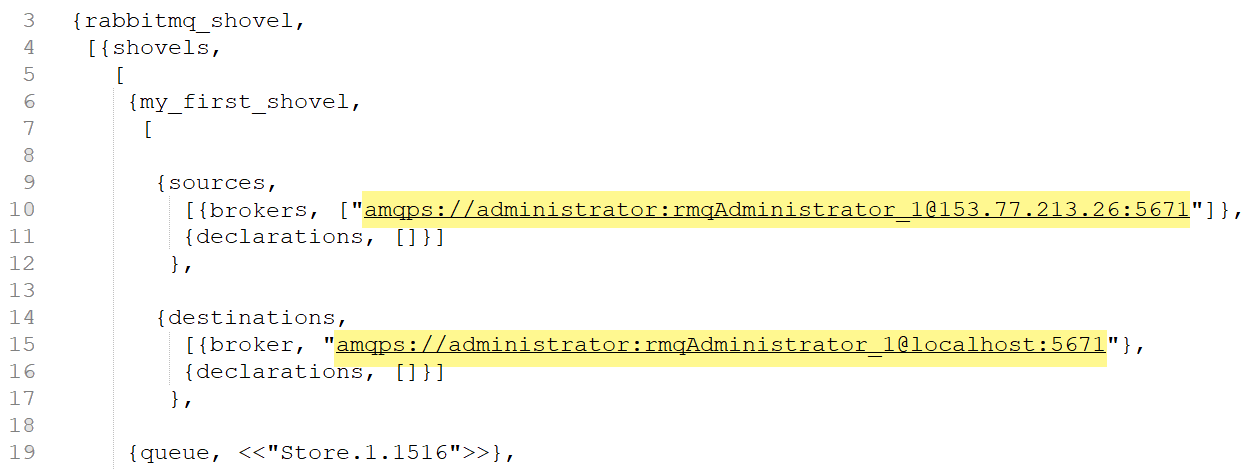
- Locate the rabbitmq_shovel tag.
- Replace the values for each attribute listed in the following table.
Attribute Value sources, broker ampqps://<RabbitMQ administrator username>:<Password>@<Name or IP address of the Messaging Server Machine>:5671 Exampleamqps://administrator:Password1@153.77.213.26:5761
destinations, broker ampqps://<RabbitMQ administrator username>:<Password>@<Name or IP address of the In-Store Server machine>:5671 Exampleamqps://administrator:Password1@localhost:5761
The edited section will look similar to the following sample image.
- Save the changes.