Connecting the POS Terminals to the Enterprise
The Advanced Store System Setup application establishes the connection between the Advanced Store POS application and the Enterprise servers using information in a file called InputsList.dsixml. This file is created by running the POS Custom Input Creator.
By default, the POS is configured to connect to a secure network. The POS Input Creator has the HTTPS protocol and ports enabled by default.
The following steps are crucial to ensure that the POS application connects to the Enterprise. For more information, consult with an NCR Representative.
Establishing the Enterprise Connections
Creating the connection between the POS or In-Store server and the Enterprise servers involves two main steps:
- Running the AS POS Input Creator
- Running AS System Setup
Best Practices
Before starting this procedure, the following steps are suggested:
- If the machine has not yet been restarted, restart it now.
- Make a note of the directory where the NCR Advanced Store POS Custom Input Creator.msi executable file is saved.
- Make a note of the computer names or the IP addresses of the Enterprise servers to which the POS application will connect.
Running the AS POS Input Creator
The POS Input Creator, NCR Advanced Store POS Custom Input Creator.msi, generates the InputsList.dsixml file.
The POS Input Creator should not be run on the POS Terminal or In-Store server.
The InputsList.dsixml file can be reused after it has been created, and it is valid until the next revision of the configuration data. The file can also be applied to the POS from any location. When installing a new build, a new InputsList.dsixml file must be created.
To create the InputsList.dsixml file, follow these steps:
- On a system other than the POS machine, run the NCR Advanced Store POS Custom Input Creator.msi installer.
The NCR Advanced Store POS Custom Input Creator InstallShield Wizard is displayed.
- Select Next. The application displays the Destination Folder.
- Select Next. The application displays the POS System screen.
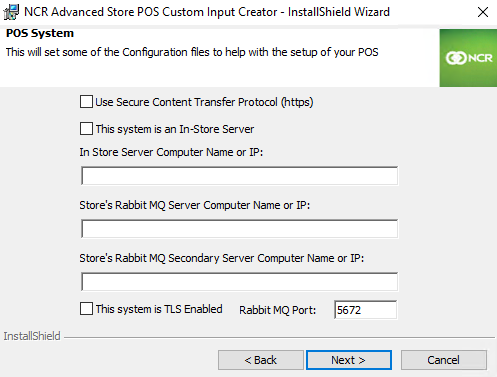
- Use the following table to enter the appropriate values.
Field name Description Use Secure Content Transfer Protocol (HTTPS) Secures in-store communications on the POS or In-Store Server through HTTPS protocol. This system is an In–Store Server Installs files required for this machine to serve as the master POS terminal or the In–Store Server in the store. ImportantDo not select this checkbox when installing the POS terminals.
In–Store Server Computer Name Specifies the computer name or IP address of the In–Store Server that the POS software on this terminal will connect to.
RabbitMQ Server Computer Name Specifies the computer name or IP address of the RabbitMQ server located in the store. NoteThis may or may not be the same machine as the In-Store Server. If RabbitMQ is installed on the same machine as the In-Store Server, enter the exact same computer name entered on the first field of this screen.
Important Make sure to use the in-store RabbitMQ server in this field, and not the enterprise RabbitMQ server.RabbitMQ Secondary Server Computer Name Specifies the computer name or IP address of the secondary RabbitMQ Server, if available. NoteIf none exists, leave the field blank.
This system is TLS Enabled Specifies whether the system will use AMQPS protocol to communicate with the store RabbitMQ Server. NoteDo not select this box if the system will not use AMQPS protocol.
RabbitMQ Port Specifies the port number of the RabbitMQ. Valid values: - 5672—if system will use AMQP protocol to communicate with the store RabbitMQ Server. This is the default communication protocol used in Advanced Store systems when communicating with the RabbitMQ Server.
- 5671—if system will use AMQPS protocol to communicate with the store RabbitMQ Server.
- Select Next. The application displays the Enterprise Setup screen.
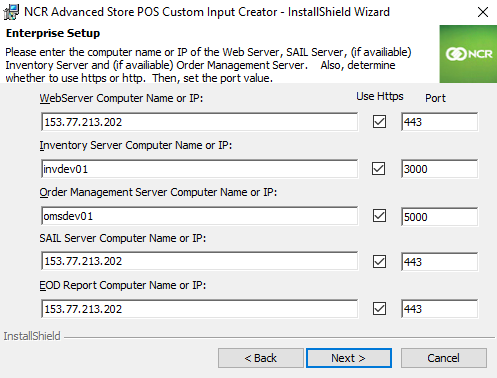
- Use the following table to enter the appropriate values.Note
Microsoft Internet Information Services (IIS) should be configured to support the HTTPS protocol, and the port numbers should correspond to those used with the POS terminal. Change the port numbers to match the POS terminal ports, if necessary.
Field name Description Default protocol Port number WebServer Computer Name or IP Specifies the computer name or IP address of the Enterprise Web Server. HTTPS 443 Inventory Server Computer Name or IP Specifies the computer name or IP address of the Inventory Management Server (IMS).
If IMS features are not being used, leave the field blank.
HTTPS 3000 Order Management Server Computer Name or IP Specifies the computer name or IP address of the Order Management Server (OMS).
If OMS features are not being used, leave the field blank.
HTTPS 5000 SAIL Server Computer Name Specifies the computer name or IP address of the SAIL Server.
If SAIL is installed on the Web Server, enter the name of the Enterprise Web Server again.
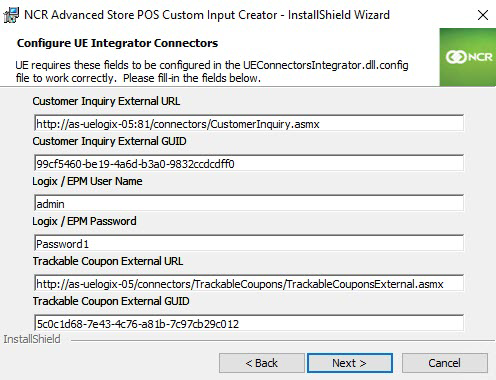
HTTPS 443 EOD Report Server Computer Name or IP Specifies the computer name or IP address of the EOD Report Server. The Web Server could also be the EOD Report Server. HTTPS 443 - Select Next. The application displays the Configure UE Integrator Connectors screen.
 Note
NoteThe values for the fields in this screen exist on the Logix server. The Logix server is assumed to already have been set up before installing and configuring the POS application. For assistance on locating the values for these fields, consult with an NCR Representative.
- Use the following table to complete the fields on the screen.
Field name Example Description Customer Inquiry External URL http://as-uelogix-01:81/connectors/CustomerInquiry.asmx Indicates the web service URL where the CustomerInquiry connector is saved. The CustomerInquiry connector performs the functions of the customer inquiry section of the Logix server, particularly viewing and adjusting points balances. Customer Inquiry External GUID 738a0e32-e8cb-45e5-9daf-cbc51d432c41 Indicates the Globally Unique Identifier (GUID) of the CustomerInquiry connector, which consists of a 32-character hexadecimal code used as a password. This GUID is used by the CustomerInquiry connector to control access to its operations. Logix/ EPM User Name admin Specifies the user name that is associated with an authorized role for performing specific functions on the Logix server. The POS validates this user name against the Logix server to establish a connection. Logix/ EPM Password Password1 Specifies the corresponding password for the authorized user name in the previous field. The POS validates this user name against the Logix server to establish a connection. Trackable Coupon External URL http://as-uelogix-01/connectors
/TrackableCoupons/TrackableCouponsExternal.asmxIndicates the web service URL where the Trackable Coupons External connector is saved. The Trackable Coupons External connector allows the UE promotional engine to scan, redeem, query, and unlock trackable coupons used by a customer. Trackable Coupon External GUID 23cc7f4e-009a-4da0-a7e6-66d042e4914c Indicates the Globally Unique Identifier (GUID) of the Trackable Coupons External connector, which consists of a 32-character hexadecimal code used as a password. This GUID is used by the Trackable Coupons External connector to authenticate and identify the web service request for the trackable coupon functions. - Select Next. Depending on the version number of the integrated AMS Service, the application may respond with one of the following scenarios:
- If the integrated AMS version is 7.x or later, the application displays additional fields on the Configure UE Integrator Connectors screen.
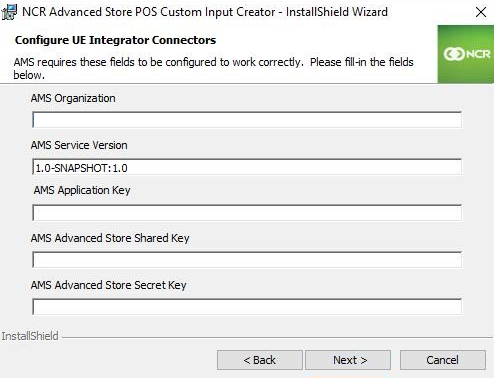
Use the following table to complete the fields on the screen.
Field name Example Description AMS Organization ams Indicates the mapped ID of the integrated AMS Security Service. AMS Service Version 1.0-SNAPSHOT:1.0 Indicates the version information of the integrated AMS Security Service. AMS Application Key 8a808f025c8d6c08015cf1c36511007e Indicates the application key provided by the AMS Security Service after configuration. The application key consists of a 32-character hexadecimal code. AMS Advanced Store Shared Key 834d1b57100d4e38ac3e4686443799f9 Indicates the store key provided by the AMS Security Service after configuration. The shared key consists of a 32-character hexadecimal code. AMS Advanced Store Secret Key c9f18b279deb4bb3a279208726be1d5a Indicates the secret key provided by the AMS Security Service after configuration. The secret key consists of a 32-character hexadecimal code. - If the integrated AMS version is of an earlier version than 7.x, the application displays the Ready to Install the Program screen. Proceed to step 11 to continue.
- If the integrated AMS version is 7.x or later, the application displays additional fields on the Configure UE Integrator Connectors screen.
- Select Install on the Ready to Install the Program screen. The application installs the configurations.
- Select Finish. The application closes the Installation Wizard window.
Verifying creation of the Inputs List file
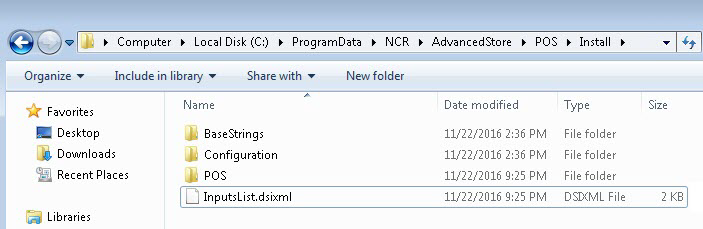
To verify that the InputsList.dsixml file has been created, follow this step:
- Go to the destination folder specified during installation, and verify that the InputsList.dsixml file exists in this directory.
The default directory is %PROGRAMDATA%\NCR\AdvancedStore\POS\Install.
Running AS System Setup
This procedure runs the System Setup utility. To capture System Setup logs, use the –v flag. You can specify the logging level, between 0–2.
NCR recommends enabling logs for troubleshooting purposes.
To connect the POS to the Enterprise, follow these steps:
- Stop the following local system services:
- Windows Update
- NCR AS Pos Client Connection ManagerNote
If the service cannot be stopped from the system Services application, open the local Windows Task Manager and end the Ncr.As.PosClientConnectionManager.exe process.
- Open the command prompt using the Run as administrator option.
- Navigate to the following directory, where the Ncr.As.SystemSetup.exe file is located:
- For a system with a 32-bit OS: %PROGRAMFILES%\NCR\AdvancedStore\POS\SystemSetup
- For a system with a 64-bit OS: %PROGRAMFILES(X86)%\NCR\AdvancedStore\POS\SystemSetup
- At the command prompt, enter the following command:
Ncr.As.SystemSetup.exe -t PosPostInstallCfg.xml -s PosGlobalSettings.xml -i %PROGRAMDATA%\NCR\AdvancedStore\POS\Install\InputsList.dsixml -v 2
There is no indicator that the settings were successfully configured. To verify, refer to the next step.
Verifying the POS to Enterprise connections
To verify if the POS to Enterprise connections have been configured, follow these steps:
- Go to the following directory:
- For a system with a 32-bit OS: %PROGRAMFILES%\NCR\AdvancedStore\POS\Configuration
- For a system with a 64-bit OS: %PROGRAMFILES(X86)%\NCR\AdvancedStore\POS\Configuration
- Sort the files by date modified.
- Verify that the time stamps for the following XML files match the date when the commands were run:
- OmsRestClient.xml
- InventoryRestClient.xml
- CommunicationManager.xml
- MessageQueueManager.xml
- AssociatesRestClient.xml
- POSClientConnectionManager.xml