SLES 15 SP5 Software RAID (UEFI)
The following procedure incorporates software RAID into an NCR supported terminal running NCR SLES 15 SP5 distribution. The software RAID configuration is set to RAID1 mode.
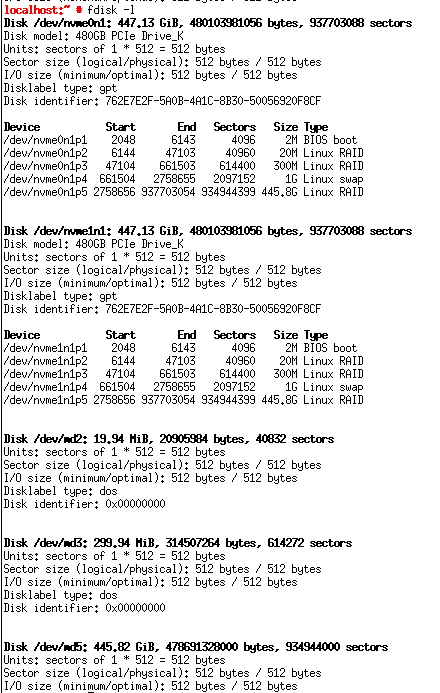
The succeeding screenshots are from a CX7ii terminal with two 480GB NVMe hard disks:
- nvme0n1—disk 1
- nvme1n1—disk 2
The five partitions are as follows:
- 1—MBR
- 2—boot/efi
- 3—boot
- 4— swap
- 5—root
The procedure may need to be modified for use in other OS, when using SATA drives, or using a different terminal. It is also assumed that two drives of the same type are used. At all times, it is assumed that the commands are run as a root user.
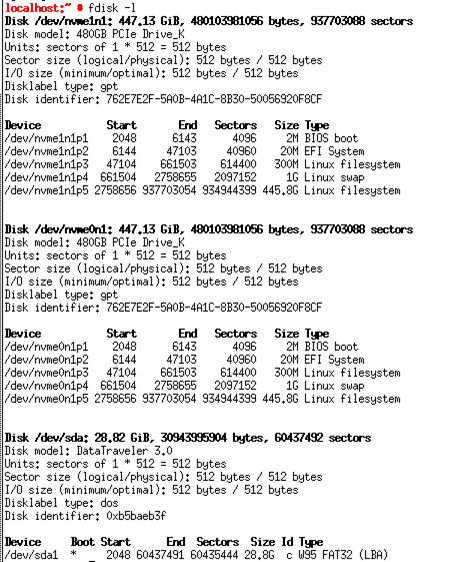
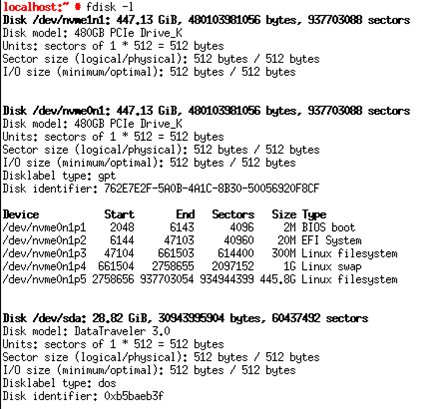
- Determine the terminal’s current OS partitions. In this case, the current OS is on /dev/nvme0n1 and its partitions are:
- /dev/nvme0n1p1
- /dev/nvme0n1p2
- /dev/nvme0n1p3
- /dev/nvme0n1p4
- /dev/nvme0n1p5
 Note
NoteIf using a SATA drive, the drive may be mounted at /dev/sda and its partitions are /dev/sda1, /dev/sda2, and so on.
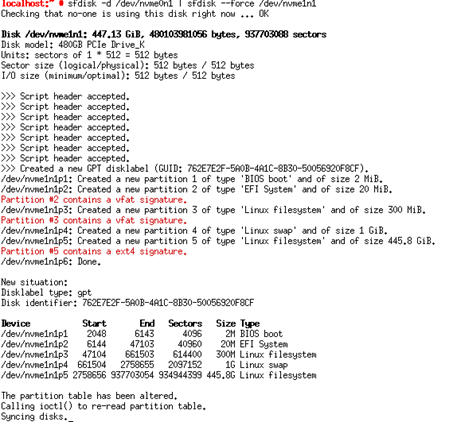
- Create the same partitions for the second disk (/dev/nvme1n1).
- Change the partition types on the second disk (/dev/nvme1n1) to Linux RAID.
- Run the following commands:Copy
sfdisk --part-type /dev/nvme1n1 2 A19D880F-05FC-4D3B-A006-743F0F84911ECopysfdisk --part-type /dev/nvme1n1 3 A19D880F-05FC-4D3B-A006-743F0F84911ECopysfdisk --part-type /dev/nvme1n1 5 A19D880F-05FC-4D3B-A006-743F0F84911E - Verify the partitions are now Linux RAID. Run the following command:Copy
fdisk -l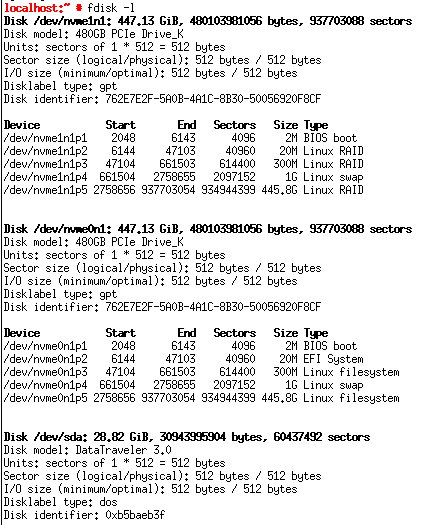
- Run the following commands:
- Create the RAID arrays.
- Run the following commands:Copy
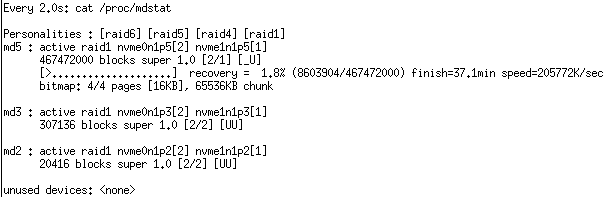
mdadm --create /dev/md2 --run --level=1 --metadata=1.0 --raid-devices=2 missing /dev/nvme1n1p2Copymdadm --create /dev/md3 --run --level=1 --metadata=1.0 --raid-devices=2 missing /dev/nvme1n1p3Copymdadm --create /dev/md5 --run --level=1 --metadata=1.0 --raid-devices=2 missing /dev/nvme1n1p Verify the created RAID arrays. Run the following command:
Copycat /proc/mdstat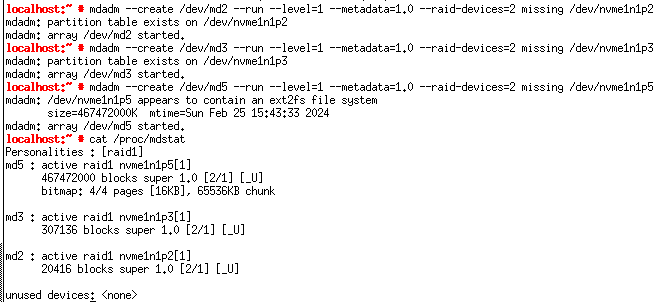
- Run the following commands:
- Format the RAID arrays with the same file systems as the current OS partitions. Run the following commands:Copy
mkfs.fat -F 16 -n "EFI" /dev/md2Copymkfs.fat -F 16 /dev/md3Copymkswap -L "SWAP" /dev/nvme1n1p4Copymkfs.ext4 -L "ROOT" /dev/md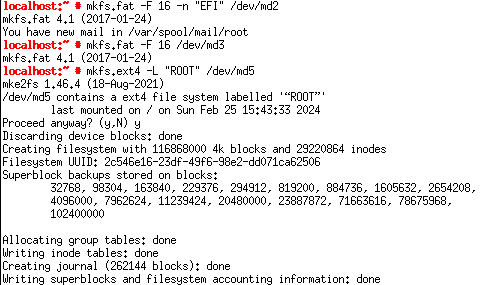
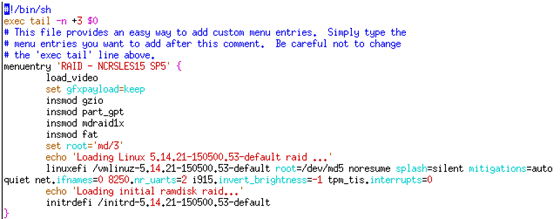
- Edit the /etc/grub.d/40_custom file and add a RAID boot entry.Copy
menuentry 'RAID - NCRSLES15 SP5' {
        load_video
        set gfxpayload=keep
        insmod gzio
        insmod part_gpt
        insmod mdraid1x
        insmod fat
        set root='md/3'
        echo 'Loading Linux 5.14.21-150500.53-default raid ...'
        linuxefi /vmlinuz-5.14.21-150500.53-default root=/dev/md5 noresume splash=silent mitigations=auto
quiet net.ifnames=0 8250.nr_uarts=2 i915.invert_brightness=-1 tpm_tis.interrupts=0
        echo 'Loading initial ramdisk raid...'
        initrdefi /initrd-5.14.21-150500.53-default
}Notemd/3 should be the partition where the /boot is located
5.14.21-150500.53-default should be replaced with the vmlinuz and initrd version of the kernel being used
ExampleBefore

After
- Update boot configurations. Run the following commands:Copy
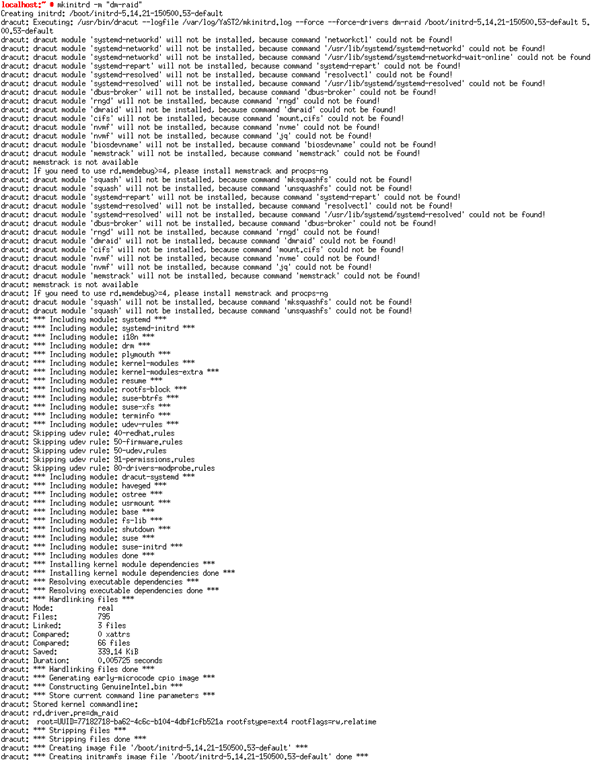
grub2-mkconfig -o /boot/grub2/grub.cfgCopymkinitrd -m "dm-raid"Copygrub2-install --modules=mdraid1x.mod /dev/nvme0n1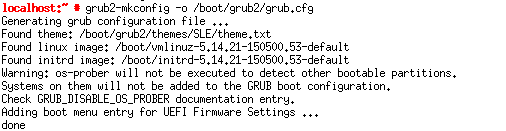

- Mount the RAID arrays (except the Swap array) to a temporary mount point. In this case, run the following commands:Copy
md /mnt/md2Copymd /mnt/md3Copymd /mnt/md5Copymount /dev/md2 /mnt/md2Copymount /dev/md3 /mnt/md3Copymount /dev/md5 /mnt/md5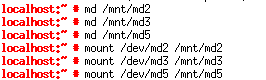
- Copy the current EFI and OS partition data to the mounted RAID arrays. In this case, run the following commands:Copy
cp -dpRx /boot/* /mnt/md3Copycp -dpRx /boot/efi/* /mnt/md2Copycp -dpRx / /mnt/md5
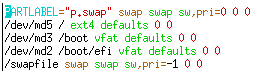
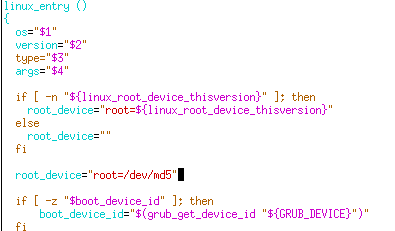
- Edit the /etc/fstab file in the RAID array and replace necessary partitions to its equivalent RAID arrays. At this point, the file is located at /mnt/md5/etc/fstab.Example
Before
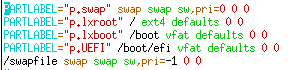
After
- Create the RAID configuration file. Run the following command:Copy
mdadm --examine --scan > /etc/mdadm.conf - Chroot to the mounted RAID array that contains the OS data and update the boot configurations. Run the following commands:Copy
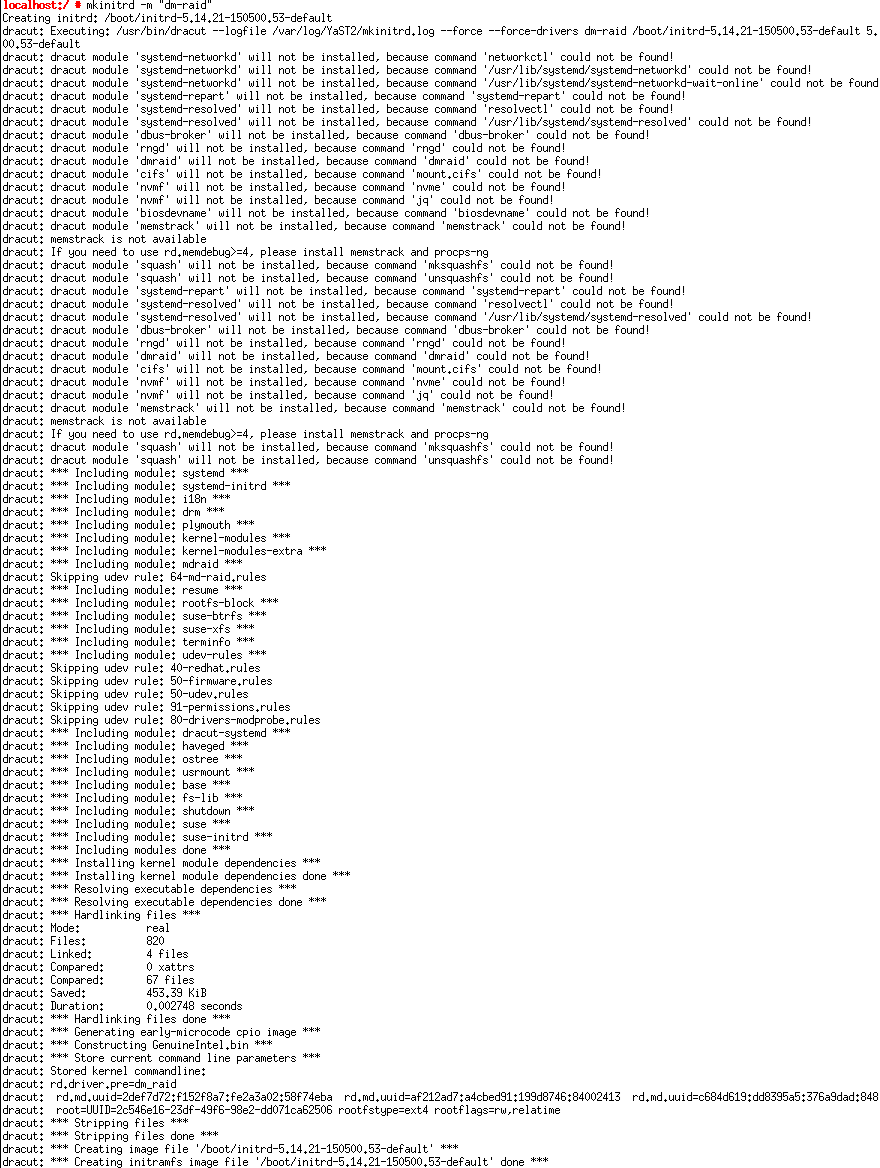
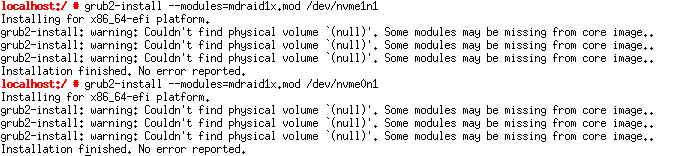
cd /mnt/md5Copymount /dev/md3 bootCopymount /dev/md2 boot/efiCopymount --rbind /dev devCopymount --rbind /sys sysCopymount --rbind /proc procCopychroot .Copygrub2-mkconfig -o /boot/grub2/grub.cfgCopymkinitrd -m "dm-raid"Copygrub2-install --modules=mdraid1x.mod /dev/nvme1n1Copygrub2-install --modules=mdraid1x.mod /dev/nvme0n1CopyexitCopyumount boot/efi boot dev sys proc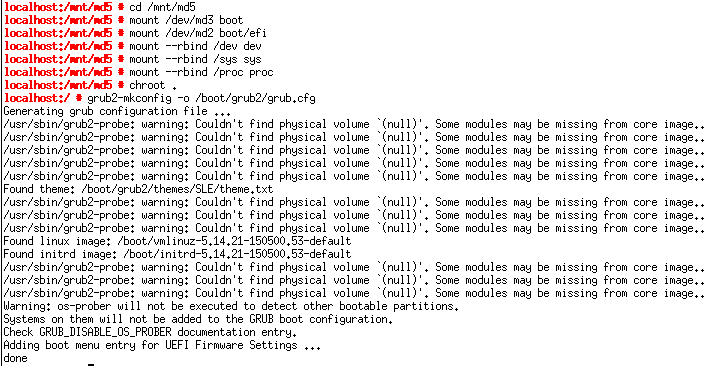
- Reboot the terminal and choose the RAID - NCRSLES15 SP5 boot entry.Note
Remove any bootable usb/flash drive at this point.
EFI boot manager will reset the default boot options. Wait for this operation to finish.
A start job for dev-md*.device is expected. Wait for this operation to finish.

At this point, the terminal should be able to boot the RAID configuration. To verify this, run the following command:
Copydf -h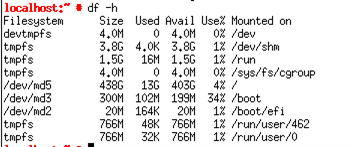
- Change the partition types of the current OS that are on /dev/nvme0n1 to Linux RAID.
- Run the following commands:Copy
sfdisk --part-type /dev/nvme0n1 2 A19D880F-05FC-4D3B-A006-743F0F84911ECopysfdisk --part-type /dev/nvme0n1 3 A19D880F-05FC-4D3B-A006-743F0F84911ECopysfdisk --part-type /dev/nvme0n1 5 A19D880F-05FC-4D3B-A006-743F0F84911E - Verify that the partitions are now Linux RAID. Run the following command:Copy
fdisk -l
- Run the following commands:
- Add the partitions from the preceding step (current OS) to the RAID arrays accordingly. Run the following commands:Copy
mdadm --manage /dev/md2 --add /dev/nvme0n1p2Copymdadm --manage /dev/md3 --add /dev/nvme0n1p3Copymdadm --manage /dev/md5 --add /dev/nvme0n1p5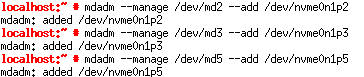
- Wait for RAID to sync the disks. Run the following commands:
- Create the RAID configuration file. Run the following command:Copy
mdadm --examine --scan >> /etc/mdadm.conf - Edit the /etc/grub.d/40_custom file and remove the RAID boot entry.
- Edit the /etc/grub.d/10_linux file and replace necessary partitions to its equivalent RAID arrays.
- Update the boot configurations of the two disks. In this case, /dev/nvme0n1 and /dev/nvme1n1. Run the following commands:Copy
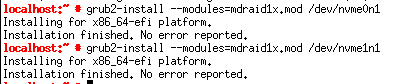
grub2-mkconfig -o /boot/grub2/grub.cfgCopymkinitrd -m "dm-raid”Copygrub2-install --modules=mdraid1x.mod /dev/nvme0n1Copygrub2-install --modules=mdraid1x.mod /dev/nvme1n1

- Reboot the terminal and expect that there is no RAID boot entry. The terminal should now boot on RAID1 configuration.Note
It is possible to test if RAID1 is working by shutting down and removing one of the drives, the system should still boot as normal. When that happens, one of the drives may be disconnected from the RAID1 array. Add the drive back to the array using the following commands:
Copymdadm /dev/md2 -a /dev/nvme1n1p2Copymdadm /dev/md3 -a /dev/nvme1n1p3Copymdadm /dev/md5 -a /dev/nvme1n1p5