Generating the receipt in digital format
When the digital receipt feature is enabled, associates can provide customers the choice to have a receipt sent to their e-mail addresses. For transactions with gift receipts, selecting Both or Digital as the receipt preference enables the POS to send the gift receipt and the customer sales receipt to the specified customer e-mail address in separate e-mails.
This feature is managed by a digital receipts server that is configurable. To use the Digital Receipts feature, ensure that the following conditions are met:
- Enable the feature on the Application Server during installation of Advanced Store. For more information, refer to Enabling digital receipts.
- Configure the Digital Receipt options. For more information, refer to Server Options > Data Management > Digital Receipts.
Configurable features
The POS application can be configured with the following features.
- Integrate with a third-party digital receipt application. For more information on third-party digital receipt applications, consult with an NCR Representative. Refer to the following options:
- Experian Receipts > all options
- Specify whether the e-mail address is entered using the POS or the PIN pad as the default device. Refer to the following option:
- Loyalty Options > Default to POS for: Member Lookup, Enroll, Receipt Preference, Email, Phone and Zip
- Display an information message when an associate or customer enters an e-mail address that does not pass third-party validation. Permit the associate to return to the view or accept the invalid e-mail format. Refer to the following option:
- Customer Configuration > Bypass Customer Email Validation
- Manually enter an e-mail address or change an existing e-mail address on the PIN pad. Refer to the following options:
- Customer Configuration > Email Confirmation and Opt in
- Retrieve the last e-mail address on file associated with the customer’s previous credit card transaction. Refer to the following option:
- Customer Configuration > Email Source for Digital Receipt
To generate the receipt in digital format, follow these steps:
- From the Tender Menu screen, select a payment method.
- Select or enter a cash tender amount. The application displays the Receipt Preference screen.
- From the Receipt Preference screen, select Digital. The application displays the Customer Email screen.
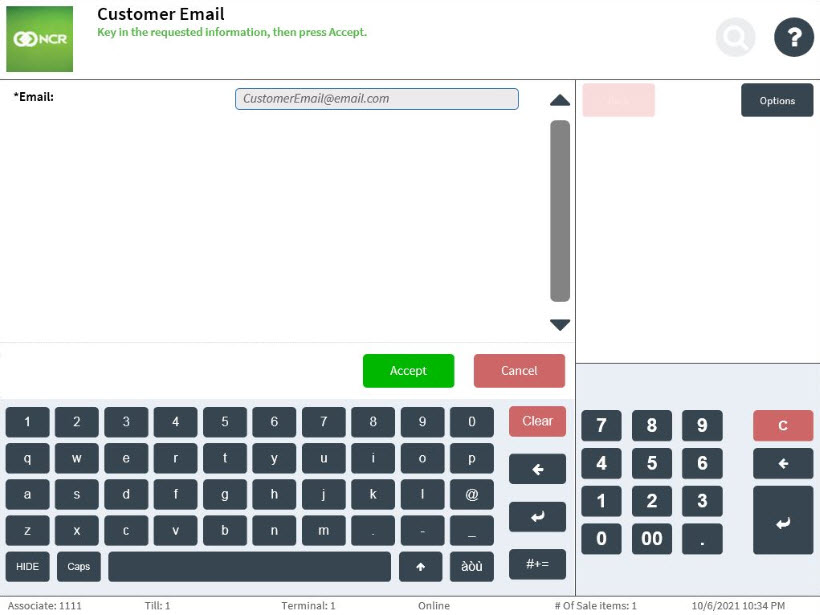
- Enter the customer’s e-mail address, then select Accept. The application displays the Change Due screen.Note
If a member has been added to the transaction, the POS application displays a message to confirm if the member’s e-mail address is correct. The member can confirm or update the e-mail address. When the member’s e-mail address has been updated during the e-mail correction, the POS skips the e-mail confirmation and completes the transaction.
- Close the cash drawer. The application displays the Sale Main Menu or the Transaction Types screen. The receipt is sent to the customer’s e-mail address.
Digital receipt