EOM Parameter Staging
Retailers can use the EOM Parameter Staging service to reduce the database load incurred when a large number of POS terminals reload parameters at the same time. The EOM staging process populates parameter requests per device to the dbo.OrgDeviceOptions table in the RTEEnterpriseOptionsData database. This service should be enabled after running the NCR Data Setup utility in any process that involves an EOM upgrade.
After a new Touch Type is added, the EOM Parameter Staging service should be enabled and started.
To enable the EOM Parameter staging service, do the following:
- Configure the settings in the EOM Parameter Staging configuration file on the Application server.
- Publish a message to the EOM staging queue using the Store Data Push utility on the Messaging server.
These steps are described in this section.
Enabling the EOM Parameter Staging service configuration settings
Retailers need to enable the parameter staging service and configure settings using the EOM Parameters Staging Service configuration file.
This task uses the following file.
| File name | Folder |
|---|---|
| Ncr.Retail.Services.EOMParameterStaging.exe.config | %PROGRAMFILES(X86)%\NCR\DSREnterprise\EOMParaStage |
To enable the EOM Parameter Staging service, follow these steps:
- On the Application Server, open the Ncr.Retail.Services.EOMParameterStaging.exe.config file.
- Locate the <appSettings> tag.
- Inside the <appSettings> tag, set the required values accordingly.
App setting Code line Source Queue Name <add key="EOMParameterStaging.SourceQueueName" value="[Value]"> Source Virtual Host <add key="EOMParameterStaging.SourceVirtualHost" value="[Value]"> Source Host <add key="EOMParameterStaging.SourceHost" value="[Value]"> Default Root <add key="EOMParameterStaging.DefaultRoot" value="[Value]"> Batch Size <add key="EOMParameterStaging.BatchSize" value="[Value]"> Max Retries <add key="EOMParameterStaging.MaxRetries" value="[Value]"> Retry Delay <add key="EOMParameterStaging.RetryDelay" value="[Value]"> NoteThe value for this setting is in milliseconds.
Taxonomy Thread Wait <add key="EOMParameterStaging.TaxonomyThreadWait" value="[Value]"> NoteThe value for this setting is in milliseconds.
NoteThis setting specifies the amount of time for the EOM synchronization service to delay processing new taxonomy messages within the EOM structure. The value can be increased if more time is needed before the staging service populates the new entries to the stage table for the configured device names or touch types.
Corporate <add key="Corporate" value="[Value]"> Device Names <add key="DeviceNames" value="[Value]"> NoteNew touch types should be added to this value, separated by a semicolon.
Example<add key="DeviceNames" value="POS;SERVER;MOBILE">
Default Device <add key="DefaultDevice" value="[Value]"> Options Timeout <add key="OptionsTimeout" value="[Value]"> NoteThe value for this setting is in seconds.
Reload Data at Startup <add key="EOMParameterStaging.ReloadDataAtStartup" value="[Value]"> Version Sync Timer <add key="EOMParameterStaging.VersionSyncTimer" value="[Value]"> NoteThe value for this setting is in seconds.
The following example displays an enabled configuration.
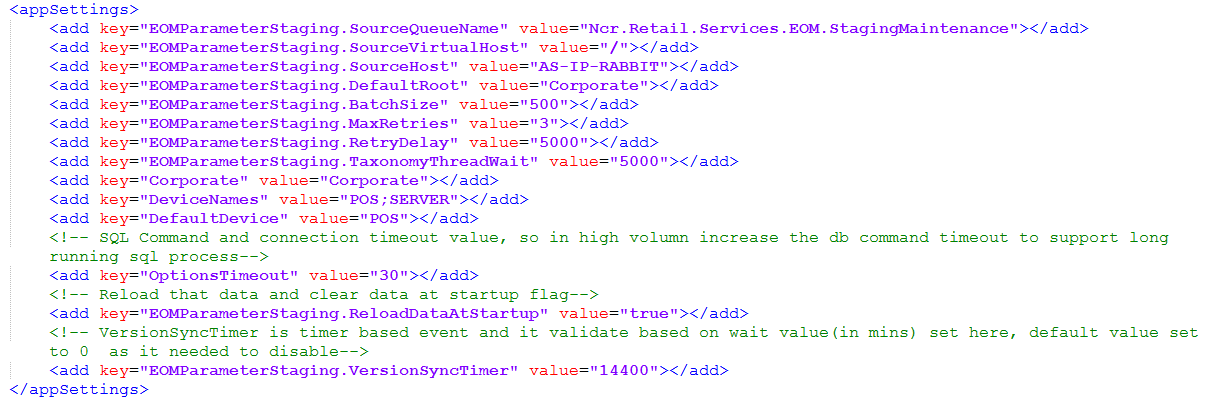 Note
NoteTo configure the service, both the EOMParameterStaging.ReloadDataAtStartup and the EOMParameterStaging.VersionSyncTimer parameters need to be enabled.
- Save the changes.
- Go to Windows Services, and then restart the Ncr.Retail.EOMParameterStaging service.
Publishing a message to the EOM staging queue
Retailers need to publish a message to the EOM staging queue to refresh the staging data for the taxonomy. The message is published using the Store Data Push utility on the Messaging server.
The utility can also be run using the command line. For more information, refer to EOM Parameter Staging Command.
This task uses the following file.
| File name | Folder |
|---|---|
| Ncr.Retail.Setup.StoreDataPush.exe | %PROGRAMFILES(X86)%\NCR\DSREnterprise\Utilities |
To publish a message to the EOM staging queue using the Store Data Push utility, follow these steps:
- Verify that the EOM Staging Maintenance queue exists in the RabbitMQ message queues, and then ensure that the EOMStagingRefresh and Options routing keys are bound. For more information, refer to Verifying the EOM Staging Maintenance queue.
- On the Enterprise Messaging Server, run the Ncr.Retail.Setup.StoreDataPush.exe program. The application displays the Store Data Push screen.
- Enter the Enterprise Messaging Server host name or IP address.
- Select to EOM staging queue.
- Select By Taxonomy and select the store hierarchy or hierarchies that need to have the EOM parameter version synchronized in the OrgDeviceOptions table.
- Select Run. The application displays a confirmation message.
- Select Yes to continue. The message is recorded in the application event log and is published to the appropriate queue in RabbitMQ Server.
Verifying the EOM Staging Maintenance queue
For the Store Data Push utility to publish a message to the EOM staging queue, verify that the Ncr.Retail.Services.EOM.StagingMaintenance queue exists in the RabbitMQ message queues and that the EOMStagingRefresh and Options routing keys are bound to it.
Missing queues or bindings could cause the OrgDeviceOptions table not to be refreshed after Store Data Push sends a publish message to the EOM Parameter Staging queue. In addition, the OrgDeviceOptions table might not be updated with the latest EOM change deployment.
To verify, follow these steps:
- Open the RabbitMQ Management web page in a Web browser and, based on the communication protocol used for RabbitMQ, enter the corresponding URL.
Communication Protocol URL HTTP (Unsecured) http://<Messaging Server machine name or IP address>:15672 HTTPS (Secured) https://<Messaging Server machine name or IP address>:15671 - Enter the required login credentials.Note
The username and password are case sensitive.
- From the RabbitMQ Management web page, select the Queues tab. The application displays the message queues.
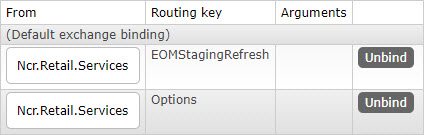
- Select the Ncr.Retail.Services.EOM.StagingMaintenance queue, and then expand the Binding button.
- Ensure that the EOMStagingRefresh and Options routing keys exist and are bound.