Understanding the screen sections
The following image displays the main sections of the POS application, using the Sale Main Menu screen as an example.
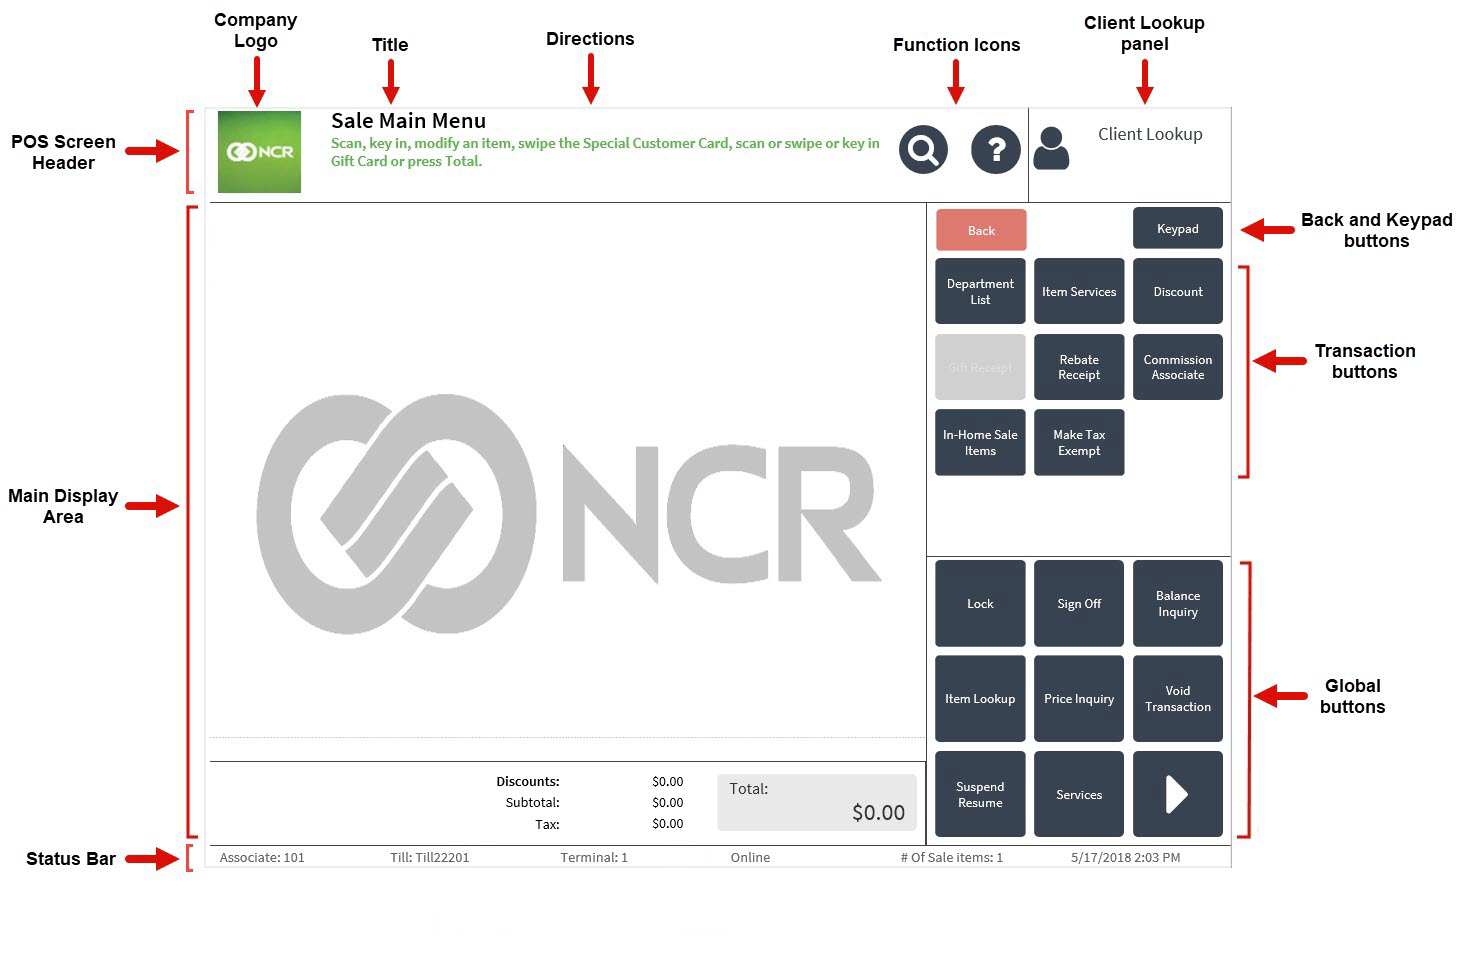
The screen is divided into different sections, each displaying specific information. These sections are defined by the type of information they display. User Interface elements or text in each section can be customized to meet retailer's requirements. For more information, refer to Theming the POS Application.
The screen consists of the following main sections:
- POS Screen Header
- Main Display Area
- Back and Keypad buttons
- Transaction buttons
- Global buttons
- Status Bar
POS Screen Header
The POS Screen Header, centered at the top of the screen, provides the following information:
- Company logo
- Title of the screen or menu displayed
- Directions—provide instructions to the associate relevant to the current task. these are located below the POS screen title.
- Function icons
- Client Lookup panel
Function icons
The function icons provide quick access to specific POS features, such as looking up an item. Retailers can customize the function icon images or colors. For more information, refer to Changing the POS Function Icons.
The following table describes the function icons.
| Icon | Name | Description |
|---|---|---|
|
|
Item Lookup | Provides the option to look up items. |
|
|
Help Menu | Provides detailed information related to the current task. |

Client Lookup panel
The Client Lookup panel provides the option to search for customers, add them to a transaction, or enroll customers. After selecting a customer, the Client Lookup panel displays the customer’s name, phone number, and rewards balance. To customize the Client Lookup panel, refer to Adding a third line to the Client Lookup panel.
Main Display area
The main display area is located in the middle section of the screen. This section changes according to the functionality selected for different areas of the POS application. Some screens display a list of products, input fields, additional buttons, or display-only information. Where applicable, the main display area includes Subtotal and Total calculations.
The main display area can be configured to display a watermark as a background or remove the default NCR logo watermark. For more information, refer to Replacing the POS Screen Background Image.
Back and Keypad buttons
The Back and Keypad buttons are displayed on all POS transaction screens. Selecting Back displays the previous screen. The Keypad button switches between displaying the keypad and the global buttons.
Transaction buttons
The Transaction Buttons section, located below the Back and Keypad buttons, contains dynamic buttons. This section provides options relevant to the associate’s current task.
Transaction buttons change based on an associate’s task within the transaction.
Global buttons
The Global buttons, located at the lower-right section of the screen, provide the associate with additional functions to use. These buttons have the same labels, regardless of the screen displayed. When active, the global button functions remain the same regardless of an associate’s screen within a transaction.
On some screens, the global buttons are hidden and the numeric keypad is displayed in their place. To display the global buttons from the Keypad view, select Options on the upper-right section of the screen. The POS application displays the global buttons.
Select a global button to access each function. To scroll through the ribbon buttons, touch and slide through the ribbon or select the right-arrow button. The POS application can be configured to hide, display, and rearrange the global buttons. For more information, refer to Display or rearrange Global Buttons.

The global buttons include the following functions.
| Global button | Description |
|---|---|
| Lock | Locks the POS terminal. |
| Sign Off | Signs off the current associate from the POS terminal. |
| Balance Inquiry | Checks the balance of a customer’s gift card. |
| Item Lookup | Displays the Item Lookup screen that enables associates to search for items by entering the item code, item description, item vendor, item department, item size, item style, or item color. |
| Price Inquiry | Searches for items that can be added to the transaction. |
| Void Transaction | Cancels the current transaction. |
| Suspend/Resume | Suspends or resumes a sales transaction. |
| Services | Provides access to a set of standalone services, such as gift receipt balance inquiry, which can be accessed outside of a sale. Some of these services can be accessed without being signed on to the POS terminal. |
| Applications Menu | Displays a selection of other applications that can be launched from the POS application. Note
The Applications Menu global button works from every screen. |
| Time Keeping | Records the associate’s working time. |
| House Card Lookup | Searches for house card accounts to look up the amount of credit available. |
| Credit Application | Starts the credit application process. |
| Diagnostic Information | Displays the diagnostic information of the POS application. For more information, refer to POS Diagnostic Information. |
| Force Drawer Open |
Opens the cash drawer with a single button press in emergency situations. Note
This button is not displayed by default.
|
| Right Arrow | The right-arrow button is located on the lower right-hand corner of the global buttons. When selected, it displays additional global buttons. |
Depending on the POS function performed, some global buttons might be disabled on specific screens.
Status bar
The status bar is located at the bottom of the and displays POS Terminal details.

The following table describes the information presented on the status bar.
| Information | Description |
|---|---|
| Associate | Identifies the associate signed on to the POS terminal. |
| Till | Indicates the identification number of the till that’s inserted in the POS terminal’s cash drawer. |
| Terminal | Indicates the identification number of the POS terminal. |
| POS Terminal Status | Indicates the status of the POS terminal’s connection to the server. The status can be either Online or Offline. |
| # Of Sale items | Indicates the number of merchandise items included in the sales transaction. The POS can be configured to count non-merchandise items as items for sale. For more information, refer to Item Setup. |
| Date | Indicates the POS transaction date. |
| Time | Indicates the POS transaction time. |